Wednesday, December 25, 2013

Youtube with Google Apps e-mail account


Enable youtube with google apps email account.
When you try to sign in youtube with google apps email account first, you sometimes see "YouTube is not available" message.

At that time, you have to enable youtube in your google apps admin dashboard panel as follows:


1. Log in (sign in) your google apps admin account in any google product.
2. Go to your admin panel (google apps dashboard)
    - You can go to admin panel from google apps manager e-mail.
    - Or you can go there in admin.google.com
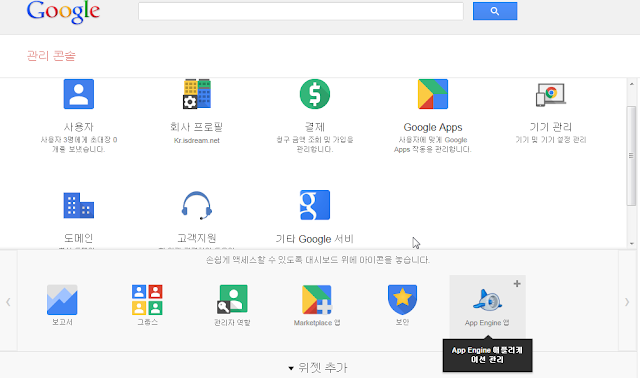
  You will see the following admin console panel. At bottom, you can see "Add Widget"

3. Move other google service Widget by drag and drop to main console area from widget.


Then, click other google service.


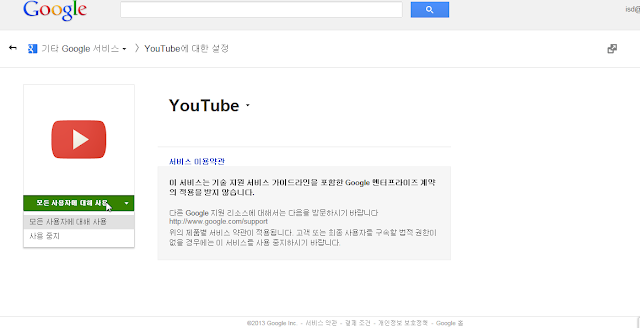
4. You will see other google services. At bottom, there is youtube. Click youtube icon.
 

5. Select Use for all users and you will see green bar.


That's it. Now you can sign in youtube with your google apps e-mail
Thank you.

Tuesday, December 24, 2013

Google Xml Sitemaps in wordpress magento fishfig integration.

After installing Fishfig wordpress magento integration, you will see some warning sign that recommends using Google Xml Sitemaps. Then, you will go to wordpress, install and activate google xml sitemaps plugin . However, you can face some difficulties in creating sitemap.xml in default setting in case your original path and shown home url are not same.

Here is tips.

Aim: You want to make a sitemap having your magento home url (shown to other people), not original path.

1. In wordpress > Setting > General > Site Address (url) should be your magento home url

2. In wordpress Setting > Xml-Sitemap > Location of your sitemap file, select custom location
In "Complete URL to the sitemap file, including name, use your magento home url.


Now go to the upper part of google xml sitemaps plugin and create sitemap.

You can go to google webmaster tool and register sitemap for your magento store.

set CMS Block order in Magento sidebar

I inserted Social Badges and an google Adsense by using Static Block and local.xml.
It was located under the original right sidebar menu.
I did not wanted to show adsense and insert social badge above community poll of shop.isdream.net.

So, I had to change the order of Static Block.

First of all, I had to make a new static block named as right.social with its Block ID right_social.

Then, to change the order of my social static block, I use "before" or "after" in positioning property in code.

* before="-"    Places the block at the top of the sidebar, before other blocks.
*  after="-"       Places the block at the bottom of the sidebar, after other blocks.

If you want to place your block before or after a specified block, just write a specified block name instead of hyphen (-)

So, code to place a static block is as follows:

<block type="cms/block" before="-" name="right.social">
<block type="cms/block" before="some-other-block" name="right.social">
<block type="cms/block" after="-" name="right.social">
<block type="cms/block" after="some-other-block" name="right.social">

I used the first one in my local.xml and I get my social badge at top of right sidebar in Magento store.


Thursday, December 19, 2013

Snows in Seoul Korea

In winter, it snows in Korea.
This is a picture of snowing day around my village.


You can see Han river.
There are also some ski resort in Korea.
They are located in mountains and some are close to Seoul.

Korea has 4 seasons and hot in summer and cold in winter.
I hope that you enjoy winter in Korea when you visit.

Thank you.

Saturday, December 14, 2013

Add meta slider right next to logo in wordpress theme Tiga

When you upload logo in wordpress theme Tiga, there is a big space in header next to logo.
So, I want to add the slider in that vacant space.
It is better to use child theme for revision.

*** Create Slider and get a code to insert in the template
I use meta slider and I installed and activated it.

After adding slide images, select Nivo slider. I found other option does not work well in some browser. Then, select Hidden for navigation.

At bottom, find the code in Usage. I will use Template Include
Full Template Include code is just like <?php echo do_shortcode("[metaslider id=233]"); ?>

** Insert code in header.php
You will find the following in header.php
 
   <div class="site-branding">
    <?php tiga_site_title(); ?>
   </div><!-- end .site-branding -->

   <?php get_template_part( 'menu', 'primary' ); // load menu-primary.php file. ?>

I will use table and it will be changed as follows:

<table  width="900px" height="30px" border="0" cellpadding="0" ><tr>
<td align="center" valign="center" width="250px" height="30px">

   <div class="site-branding">
    <?php tiga_site_title(); ?>
   </div><!-- end .site-branding -->
</td>

   <?php get_template_part( 'menu', 'primary' ); // load menu-primary.php file. ?>


<td align="left" valign="center" width="500px" height="30px">
<div><?php echo do_shortcode("[metaslider id=233]"); ?></div>
</td></tr></table>


It will show metaslider next to your logo in header.

** Hide lines of table
After revising header.php, logo and slider will be shown with table lines. Let's hide lines by css.

In header.php, there is following css:

/*  STANDARD TABLE  ------------ */
table {
  width: 100%;
}

table,
td {
  border: 1px solid #e8e8e8;
  border-collapse: collapse;
  margin: 1.5em 0;
  padding: 5px 10px;
}


Revise border as follows:

/*  STANDARD TABLE ----------- */
table {
  width: 100%;
}
table,
td {
  border: 0px solid #ffffff;
  border-collapse: collapse;
  margin: 1.5em 0;
  padding: 5px 10px;
}


Paste it in Appearance > Theme Options > Custom Code > Custom CSS.


Thank you.

Change image size in Grid Product, Wordpress

Grid Product is a very good plug in for displaying products.

To show products, you have add <code> [product] </code> in your page.
Its default view is grid type. If you want to see magazine type, use <code>[product view=list]</code>

However, You many face hardship because of the image size in twenty twelve theme.
Default Featured Image size is half of following. The picture is full because it is Tiga theme.


In this case you have to change some code about image size in grid product plugin.

There are two ways.

1. Change and set image size:
-In your wp-content>plugins>grid product folder,  open grid-products.php.
You have to change image size as follows:

Original:
add_image_size('product-image',240,140, true);
add_image_size('product-image2',195,140, true);

After change:

add_image_size('product-image',180,180, true);
add_image_size('product-image2',180,180, true);

-Change thumnail box size.
You can find the following code for getting thumnail. You have to change the final image size.

Original:

$theimage=wp_get_attachment_image_src( get_post_thumbnail_id(get_the_ID()) , 'product-image');

    $product_shortcode .= '<tr><td align="center"><a href="' . get_permalink() . '"><img src="'.$theimage[0].'" alt="" /></a></td>';


Where to change:
revise img src part as <img src="'.$theimage[0].'" " style="max-width:100px;" alt="" height="100"  />

Thumnail parts are too. One is for list type and the other is grid type. You also have to change both.

Then, you have resize the image and upload it again in Featured Image of your post/product/page.

2. If you use Tiga theme, it is much easier.

In functions.php of Tiga wordpress theme, you can find the following

 add_image_size( 'tiga-140px' , 140, 140, true );
 add_image_size( 'tiga-300px' , 300, 130, true );
 add_image_size( 'tiga-700px' , 700, 300, true );
 add_image_size( 'tiga-620px' , 620, 350, true );
 add_image_size( 'tiga-460px' , 460, 300, true );

Paste them to grid-products.php after original add image.

Find the following codes

$theimage=wp_get_attachment_image_src( get_post_thumbnail_id(get_the_ID()) , 'product-image');
$theimage=wp_get_attachment_image_src( get_post_thumbnail_id(get_the_ID()) , 'product-image2');

Change product-image and product-image2 as tiga-140px as follows

$theimage=wp_get_attachment_image_src( get_post_thumbnail_id(get_the_ID()) ,'tiga-140px' /*'product-image'*/);
$theimage=wp_get_attachment_image_src( get_post_thumbnail_id(get_the_ID()) ,'tiga-140px' /*'product-image2'*/);

I think it is better to use comment (/* */ )because you can use it later by uncommenting.

After doing it, it can show the original image, you can resize the image in Featured Image and update.
It will show a full fit image.


Thank you.

Reference: codex.wordpress.org/Function_Reference/add_image_size

menu and content letter size, website length, theme option, Tiga wordpress theme

In using Tiga theme, you need to revise some.
I will explain as follows:

In Appearance of your wordpress dashboard, you will see Theme, Customize, Widget, Menus, Theme Options, Header, Background, Editor

* Theme: If you made the child theme, activate the child theme.
* Customize:
- Navigation: The secondary navigation is main navigation in this theme, The primary navigation is header menu.
- Static Front Page :  If you use magento wordpress integration, it is better to set as follows:
select A static page. set Front Page as it is select and Blog Page as Blog ( I named Blog for a blog page.

* Widget: There are three section: Available widget, Sidebar, Inactive widget (if you have inactive sidebar, it can be shown at bottom) You can drag and drop any available widget to sidebar at right.
It will be shown at your site

* Menu: Just drag and drop from left items and make a hierachy at right. Then you have to save it.
Please select menu setting (primary menu, secondary menu) at bottom. When you want to see other menu, you can select at top.


* Theme Options
- Typography: Just disable it. You can set letter size, etc here but I think it is better to use custom css in Custom code.

- Custom Code
Now, it is very important point. You can see Custom CSS at Custom Code of Theme Options.
It will overwrite your style.css. I will revise three: website length, menu letter size and content letter size.

1. length of main menu bar: Paste all structure script because if you paste just a part, you will lose the rest part. It can cause some strange feature in mobile view.

 You can see max-width. When you revise it 1040px, it will be 1040px.

/*------------STRUCTURAL LAYOUT --------------- */
.site {
  background-color: white;
  -webkit-box-shadow: 0 0 3px 0 rgba(0, 0, 0, 0.1);
  -moz-box-shadow: 0 0 3px 0 rgba(0, 0, 0, 0.1);
  box-shadow: 0 0 3px 0 rgba(0, 0, 0, 0.1);
  *zoom: 1;
  max-width: 940px;
  _width: 940px;
  padding-left: 20px;
  padding-right: 20px;
  margin-left: auto;
  margin-right: auto;
  margin-bottom: 18px;
  padding-bottom: 18px;
}
.site:after {
  content: "";
  display: table;
  clear: both;
}
@media (min-width: 320px) and (max-width: 1024px) {
  .site {
    margin: 0 18px 18px;
    padding-bottom: 18px;
  }
}

.site-header {
  clear: both;
  margin-bottom: 36px;
  padding-top: 18px;
}

#main {
  clear: both;
}

.site-content {
  width: 65.95745%;
  float: left;
  margin-right: 2.12766%;
  display: inline;
}
@media (max-width: 768px) {
  .site-content {
    width: 100%;
    float: right;
    margin-right: 0;
  }
}

.sidebar-primary {
  background-color: whitesmoke;
  -webkit-border-radius: 5px;
  -moz-border-radius: 5px;
  border-radius: 5px;
  -webkit-box-shadow: 0 0 2px 0 rgba(0, 0, 0, 0.2);
  -moz-box-shadow: 0 0 2px 0 rgba(0, 0, 0, 0.2);
  box-shadow: 0 0 2px 0 rgba(0, 0, 0, 0.2);
  width: 31.91489%;
  float: right;
  margin-right: 0;
  *margin-left: -20px;
  display: inline;
}
@media (max-width: 768px) {
  .sidebar-primary {
    width: 100%;
    float: right;
    margin-right: 0;
    margin-top: 12px;
  }
  .sidebar-primary .widget {
    width: 44.68085%;
    float: left;
    margin-right: 2.12766%;
    border-bottom: 0;
  }
  .sidebar-primary .widget:nth-child(2n+2) {
    display: inline;
    float: right;
  }
}
@media (max-width: 640px) {
  .sidebar-primary .widget {
    width: 44.68085%;
    float: left;
    margin-right: 2.12766%;
  }
  .sidebar-primary .widget:nth-child(2n+2) {
    margin-left: 0;
  }
}
@media (max-width: 480px) {
  .sidebar-primary .widget {
    width: 91.48936%;
    float: left;
    margin-right: 2.12766%;
  }
  .sidebar-primary .widget:nth-child(2n+2) {
    display: inline;
    float: left;
    margin-left: 18px;
  }
}

.site-footer {
  *zoom: 1;
  max-width: 940px;
  _width: 940px;
  padding-left: 20px;
  padding-right: 20px;
  margin-left: auto;
  margin-right: auto;
}
.site-footer:after {
  content: "";
  display: table;
  clear: both;
}
@media (min-width: 320px) and (max-width: 1024px) {
  .site-footer {
    margin: 0 18px 18px;
  }
}
.site-footer.four .widget {
  margin-right: 2%;
  width: 23%;
}
@media (max-width: 768px) {
  .site-footer.four .widget {
    width: 48.93617%;
    float: left;
    margin-right: 2.12766%;
  }
  .site-footer.four .widget:nth-child(2n) {
    float: right;
    margin-right: 0;
  }
}
@media (max-width: 480px) {
  .site-footer.four .widget {
    width: 100%;
    float: right;
    margin-right: 0;
  }
}
.site-footer.four .widget:last-child {
  float: right;
  margin-right: 0;
  *margin-left: -20px;
  display: inline;
  margin-left: 2%;
}
@media (max-width: 768px) {
  .site-footer.four .widget:last-child {
    margin-left: 0;
  }
}
.site-footer.three .widget {
  margin-right: 5%;
  width: 30%;
}
@media (max-width: 640px) {
  .site-footer.three .widget {
    width: 100%;
    float: right;
    margin-right: 0;
  }
}
.site-footer.three .widget:last-child {
  float: right;
  margin-right: 0;
  *margin-left: -20px;
  display: inline;
}
.site-footer.two .widget {
  margin-right: 2%;
  width: 48%;
}
@media (max-width: 480px) {
  .site-footer.two .widget {
    width: 100%;
    float: right;
    margin-right: 0;
  }
}
.site-footer.two .widget:last-child {
  float: right;
  margin-right: 0;
  *margin-left: -20px;
  display: inline;
  margin-left: 2%;
}
.site-footer.one .widget {
  width: 100%;
}
.site-footer .footer {
  clear: both;
  padding: 18px 0;
}

/*  RIGHT PRIMARY LAYOUT
 ----------------- */
.right-primary .site-content {
  float: right;
  margin-right: 0;
  *margin-left: -20px;
  display: inline;
}
.right-primary .sidebar-primary {
  width: 31.91489%;
  float: left;
  margin-right: 2.12766%;
  display: inline;
}
@media (max-width: 768px) {
  .right-primary .sidebar-primary {
    width: 100%;
    float: right;
    margin-right: 0;
    margin-top: 12px;
  }
}


2. Font size of Secondary menu
Just revise font-size in following and paste it in Custom CSS of Tiga theme.
It is called as secondary navigation

/* ---------Second menu font size---------- */
.secondary-navigation a {
  color: white;
  display: block;
  font-size: 15px;
  padding: 12px 16px;
  text-transform: uppercase;
  word-wrap: break-word;
}


3. Content font size.
You can change Content font size in entry-summary. For a letter size in widget such as Advanced Featured Page, you can change it in entry-content.widget as follows:

/* ---------Article font size---------- */
article .entry-content,
article .entry-summary {
  font-size: 13px;
  line-height: 1.6em;
}
article .entry-content .widget {
  font-size: 12px;
}

After revising all, save Custom Code.

I leave all record not to forget in future
Thank you.
child theme in wordpress to avoid loosing revision after updating

I used coller wordpress theme but for some error after updating, I changed it to twenty twelve theme for my wordpress site.

Fishfig magento wordpress plugin is basically compatible with twenty twelve and coller, etc. When you use Tiga theme, sidebar will not be shown in your wordpress blog. I solved this problem for Tiga theme and I will explain in the other post.

I leave a following record not to forget what I did in installing Taga theme.

**. Make a child theme.
When you decide your theme, it is better to use chile theme because you will revise a little for your custom revision.
- Let's say that you installed tiga.
- copy them and make a child theme : tiga-child. (If your theme is twenty twelve, twenty twelve-child)
- In child theme directorty, create a file named style.css and add following

/*
 Theme Name:     Tiga Child
 Theme URI:      http://
 Description:    Tiga Child Theme
 Author:         You
 Author URI:     http://
 Template:      Tiga
 Version:        1.0.0
*/
@import url("../tiga/style.css");
/* =Theme customization starts here
-------------------------------------------------------------- */

 ** Template
When you create your own template under the directory (page template) of child theme, it will overwrite the same name in your original tiga theme.

** Function.php
After adding some script in functions.php of your child theme, it will not overwrite the original functions.php. It just add that function of child theme to the original theme tiga.

** Including files in your child theme
When you make some file.php in your child theme, you need to include following script [get_stylesheet_directory()] in your style.css of child theme as follows:

 require_once( get_stylesheet_directory() . '/file.php' );

Make sure use the correct patch.

Using the child theme is very useful to avoid loosing revised them after updating your theme.

* give a authorization and activation: You have to set an authorization in your child theme

- chmod -R 755 (or 707) your child theme name
- Then, you will see your theme in dashboard>Appearance>Theme
- Activate your child theme.

Thank you.

Reference: codex.wordpress.org/Child_Themes

Monday, December 9, 2013

Wordpress - insert image and adjust its size

How are you?
I found the very simple thing today.
I inserted an image by add media for media center but the image size was very small thumbnail.
You can adjust the image size in wordpress as follows:

- Place a cursor where you want to insert an image. Click Add Media button.

- After uploading file, you will be directed to Media library
 Select an image.
Then, scroll down. At right bottom, there is size. You can select among thumnail, medium, large, full size.


Then, press insert into media and Update it.
That's it.

Jajangmyeon, Black bean sauce noodles in the market of our village

Do you know Jajangmyeon? or Black bean sauce noodles?
It originated from chinese Zhajiangmian[炸醬麵])[짜장면] by chinese emigrants.

For centries, there was a chinese emigrants in Incheon area of Korea.
Since they wanted to keep their nationality and they had the limited option of jobs for that reason.
Anyhow chinese emigrants were very talented in cooking and they started to sell their noodles.

Korean Jajangmeyon is more delicious than the original Chinese Zhajiangmian. It is an amazing development from the greasy chinese black noodle.
 

 Today my friend send me a picture of Jajang-myeon. It looks really sweat.
In the past, old generation of Koreans can eat a bowel of Jajangmyeon in their school graduation or entrance day. However, it is very common now because cooking Jajangmyeon is very easy and well known recipe.

I live near Chung ang university, Seoul, Korea.
I dont' eat this very often but I think I still like it.

I attach some picture of Jajangmyeon restaurant near my village for you.
It is not luxurious one but from the local market area.

Its name is Jajangmaru.
 

December of Korea in Seoul

I live in Seoul.
It is rainy today, though.

It has been longer than 20 years since I lived here.
My first place was Seongdong-gu around my university.
It is changed as Gwangjin-gu now.

I majored in English language and literature but now I work in the different field.
After graduation, I started my career in garment maker, Sinsung Tongsang.
I had to work a lot...
The company went almost bankrupt because of Daewoo bankcupsy.
I just got out of the company and tried to find a job.

For some months, I worked in Duty Free shop in Walker hotel but actually I failed there.

It passed a lot...

For that time, I experienced legal office worker, game company overseas sales, importer of medical gloves and seller of medicines.

I finally started to work in the CCTV and DVR exporter.
It was pretty good experience, though.

In the beginning of year 2011, I started my own business. First time, I started to sell CCTV and DVRs....................

Then, I made my shopping mall and started to sell gold soap, ginseng soap and scrubbers.

I do business on a basis of trust and supplying the best quality of products.
I hope to prosper with my customers.

I thank you all for buying products from my shop.

Mark

Sunday, December 8, 2013

Color of main menu, Title size, Designer name change, Set front page in wordpress theme.

After completing major installation of wordpress, there can be still something to revise in your theme.

I use fishfig worpress integration with magento and found that some theme does not support fishfig integration properly, specially in the sidebar widget.

So, I found that Coller theme is simple, supports the social badge and the origianl sidebar for magento blog. It is pretty good and I think it is not much changed from the original wordpress theme twenty twelve.

However, I found it needs some revision in Coller theme and I explain as follows:

* Style.css : style.css is in wp-content /theme/your theme folder.

- entry title


The title is too big and it needs to be revised. in style.css, search entry-title and revise font-size.

In coller wordpress theme, you can go to appearance --> collor setting --> custom css. paste the css code and revise the font size to 30px or as you want

h1.entry-title a, h1.entry-title {
 font-size: 40px;       
 color: #666;
}


- Main menu bar color (main-navigation)

In style.css file, find main-navigation by ctrl+F search. change background color code.
You can find the background color code in customizer menu that I will write in the later part of this post.

In coller theme, you can change it very easily. After installing coller wordress theme, go to appearance ->coller setting ->Basic setting. Custom CSS section is at bottom. Just paste your revised code here as follows:

.main-navigation {
 clear: both;
 display: block;
 float: left;
 width: 100%;
 background: #c5d6ba;  ------> change this color code.
 margin-bottom: 30px;
}

* Customize menu in appearance of admin panel

I have some tips here.

- Color code in customize-->colors

You can get the color code in appearance ->customize->colors->Background color -> Select color
When you click any color that you like, you can see the color code above it.


- How to set Static Front page for magento wordpress fishfig integration.

When you use wordpress homepage, you will set static page as your main page and post page as your blog page. However, I integrate my wordpress website under magento folder by fishfig extension.
When I set Front page here, magento blog shows that page. If you want to show blog page directly, just do not designate any page and leave it select as follows. Then, set Posts page as Blog.

That is what I did.

In magento wordpress integration, I just leave the original path in admin>setting>general>Site-address and I can use wordpress page as my homepage while blog is also used for magento shop.


* Revise designer name in coller theme.

After installing all, I found the sentence 'Coller Theme by...." I feel thankful for the designer but I think it is better to remove or revise it.

In wp-content/themes/coller (your theme)/footer.php, press CTRL+F for searching 'theme by'.
You will find the appropriate paragraph and revise it.

 
Just revise coller as your theme name, a href="http...... as your url and designer name as your designer name.


* Failure in update, downloading, upgrading of core, theme and new plugin.


Sometimes, after installing new plug in (it was simple optimizer), downloading and installing other plugin does not work very well. In my case, it worked but the process stage dialog was not shown.

It shows downloading----->installing ---->activation but in my case it only stopped in downloading process. I checked if there is a downloaded file in wp-content and it was there.

In that case, I deactivated every plugin and try again. Downloading worked well and shows the proper setence at each stage. Then, I activated plugins.

Thank you and I hope this post will helps you.

Saturday, December 7, 2013

Show summary or excerpt in magento wordpress integration of Fishfig by more tag

*****Why I need this function*****

After completing the integration of Magento and wordpress by Fishfig extension,
I found that my magento blog shows all posts with the full content and after clicking title, it goes to the individual post page with comment available.

It does not seem so good. So, I want to show only short summary or excerpt of each post in the landing page of magento wordpress blog.

I searched hard to figure out how I can do it. I found that it is related to app/design/frontend/base/default/template/wordpress/post/list/render/default.phtml.
I was trying to figure out how to change code for showing summary or excerpt of post but I failed.

****Found More Tag****
By chance, I found more tag "<!--more-->"  In your wordpress editor, go to text mode, there is more
 
So, in text mode, you can just press more in top or put <!--more--> where you want.
In visual mode, it will look like this
 
Now magento wordpress blog looks very nice after applying more tag as I want.
 
It will show "Continue reading->" in the place where you put more tag.

It is a simplest way to show summary or excerpt of wordpress blog in magento fishfig integration without changing any code. I wasted a lot of time to know this way and I hope that it will be helpful for you.

Thank you.

Thursday, December 5, 2013

How to remove wordpress.org in meta and adjust it in magento blog

There is one more thing to revise in wordpress.


In meta, you will see wordpress.org and you want to remove or change it.

Go to wp-includes / default-widgets.php and find the line by ctrl+F
Just delete the following or revise it.


Please remember that it will be overwritten after updating your wordpress. So you must check and revise it after upgrading.
I just changed it as my related site.

When you integrate wordpress blog with Magento by fishfig magento wordpress integration, you also need to revise some. Default meta of magento integration will show wordpress.org, Magento, Magento Wordpress Integration. Let's add comment RSS and remove others.
 

It is hard coded in fishfig magento wordpress integration tool.

Go to app/design/frontend/base/default/template/wordpress/sidebar/widget, You will see widgets.
 

You can add any widget if it exists in widget folder.
Open meta.phtml and let's revise it.


Just copy first item feed and paste it in second item. just change 'feed/' to 'comments/'
You saw comments.phtml in widget folder and erase rest of all.


Now you will see only Rss in meta of magento blog.
It is pretty cool and I think if you make a login widget in widget folder, you can also make it but it is not necessary for me.

Thank you.
 

Fishfig - Magento blog by wordpress integration

I decided to install wordpress blog in my magento shop and leave a following record not to forget how I did.

1. Download fishfig magento wordpress integration (fishpig.co.uk/magento/wordpress-integration/)
Unzip it and just put the unzipped file to your magento folder. It will be added to your magneto folder. Or, you can use magento connect.

2. Install wordpress folder under your magento folder and give them appropriate permission (chmod -R xxx magneto folder name)

tip) not to use ftp, add this code in wp-config.php:     define('FS_METHOD', 'direct');

3. After all, please flush cache in magento admin,  log out and log in. You will see wordpress in magento admin menu.

In wordpress menu, there are two dropdowns, Wordpress is for wordpress admin panel and Setting is for integration. Let's take a look at Setting.


Wordpress Integration: Yes
Database: This one does not support database integration. So set it NO.
Fill your database information. If you don't know very well. you can find the exact information in wp-config.php


Integration is menu for wordpress blog.

Home url is for magento url: blog or story as you want it shown on magento url.
It is recommended to make the same route for site url in wordpress.

Path is original path (folder name)


*Menu
There is menu and Top Link Just set as you want.
In Top Link, there is a Position. If you set it 1, it will be the first top menu.

After all, if you click wordpress of wordpress menu at top of magento admin, you will be directed to fill out ID and password of wordpress. Once you are done with it, it will be automatically redirected to your wordpress admin panel.

Tip: This integration seems to be made on Twenty twelve theme but I think it works with Coller theme and Nusantara theme. I made it on a basis of coller. If you have any good theme, please let me know.

Thank you.

rss sitemap of wordpress without using plugin for google webmaster tool

There are xml plug in for google xml sitemap for wordpress but I didn't want to use it because my page isdream.net will be mainly used for blogging.

In that case, you can just use rss feed for registering sitemap of webmaster tools.

In widget, there is meta.


 If you don't have it on your sidebar, drag and drop it on sidebar. It is automatically activated.


In your sidebar, you will see Entire RSS and Comments RSS in META.
Those will be your sitemap for posts. When you click them, you can see url and copy them as follows:
- Entire RSS:  ?feed=rss2
- Comments RSS: /?feed=comments-rss2

Please include the appropriate path when you register it in sitemap of google webmaster tools.

That's all. It is very simple.

Advanced Tip: If you are using blog for magneto and want it to be searched with magento, just change the path for magento, I think if you that way, google will think it as magento subfolder.

Thank you.
 

How to remove skip to content in wordpress

After making wordpress site with coller theme, I found something strange in main menu bar.


When I put my mouse on the above broken menu, it hovers some letter "skip to content".
I found that it is a matter of something from header.php.

So you have to get rid of it.

Location: wordpress main folder>wp-content>themes>coller
Find header.php. open it and search skip to content with alt+F key.
I copy the original as header.php.original.

Or you can also do it simply in editor in appearance of wordpress dashboard, too.
 
when you see it you can see a link, <a href="content.....> <?php_e('skip to content','coller');?> </a>

Just remove the code rendering <?php_e('skip to content','coller');?> between <a href=....></a> as follows:
 

Now, refresh your wordpress website.
 

No more broken menu by skip to content.
There are also other method by adjusting css but I think it is better.

Thank you.